Introduction:
In this tutorial you will learn how to interface HX711 loadcell amplifier board with Arduino uno and getting output on i2c oled display. Also, we will learn how to add calibration push button to zeroing the scale.
Loadcell:
Load cell is a sensor which converts mechanical force into electronic signal. Where the mechanical force can be tension, pressure, compression or torque. There are many types of load cells are available in the market which can be used as per required application. In this example we are going to use strain gauge load cell for converting mechanical force into electrical signal.
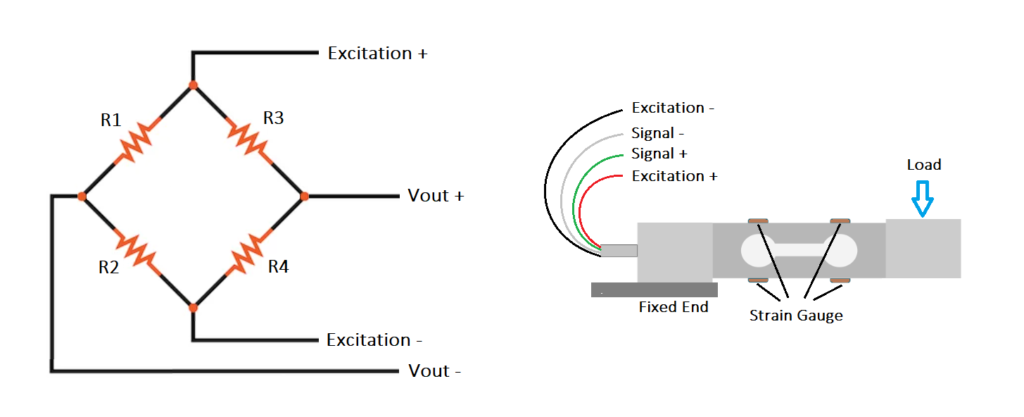
Loadcell consist of several resistive strain gauge sensor elements which changes its resistance when the load is applied and gives output in milli volts when input or excitation voltage is applied to it.
This milli volt output is then amplified to voltage signal to make it compatible with controllers to read and convert to load units.
Things You Will Need:
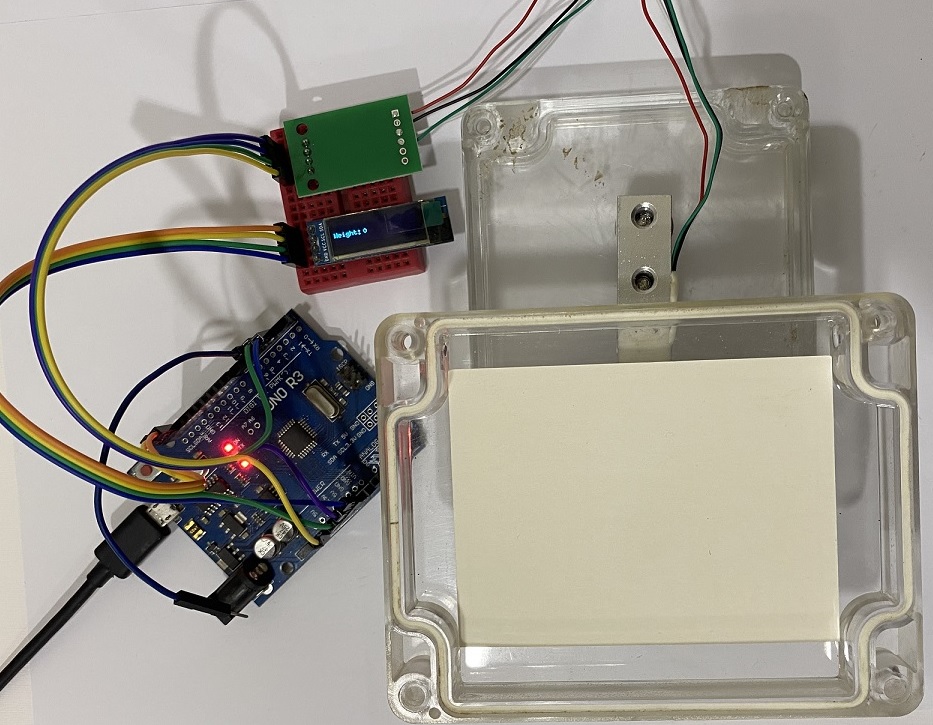
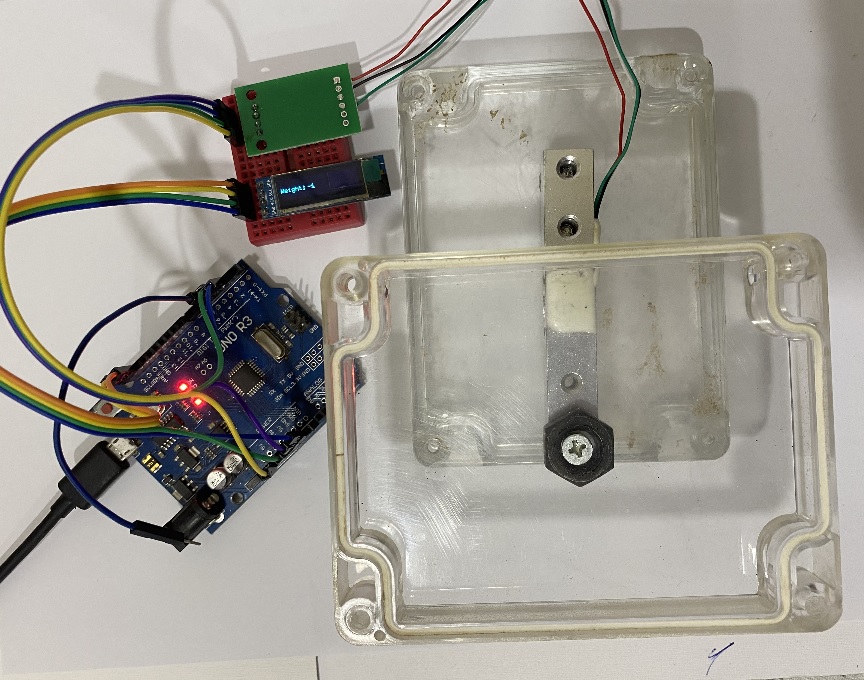
- Arduino Uno
- 10kg Loadcell
- HX711 ADC amplifier board
- i2c OLED display
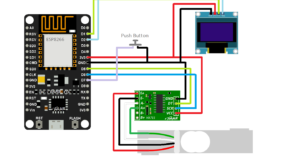
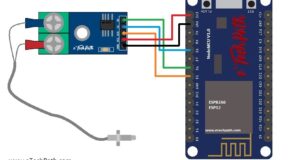
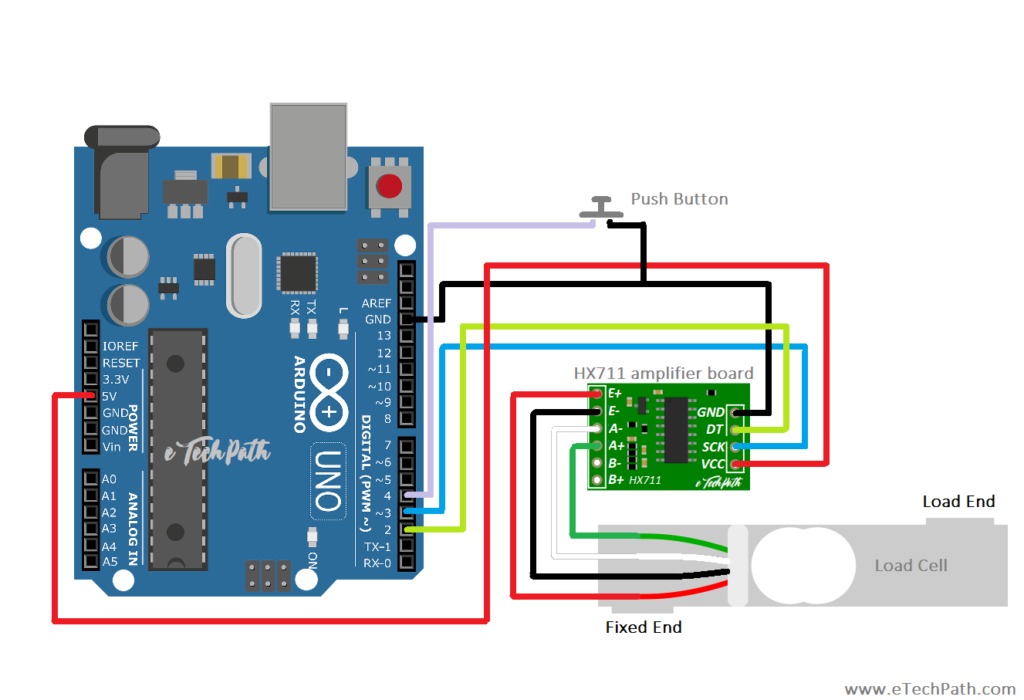
Circuit Diagram:
Code:
Example 1: In this example we will use arduino serial window to get output values from the loadcell.
/**
 *
 * Interfacing 10kg loadcell and HX711 amplifier board with Arduino Uno
 * Author: Pranay Sawarkar
 * Website: www.eTechPath.com
 * Link: https://blog.etechpath.com/diy-oled-weighing-scale-using-10kg-loadcell-with-hx711-and-arduino-uno/
 *
 *
**/

#include <Arduino.h>
#include "HX711.h"

// HX711 circuit wiring
const int Dout_Pin = 2;
const int SCK_Pin = 3;
const int pb1 = 4;
int tarepb = 0;
int newread = 0;
#define CalFactor 235.5    //enter your calibration factor here

HX711 scale;

void setup() {
  Serial.begin(115200);
  scale.begin(Dout_Pin, SCK_Pin);
  pinMode(pb1, INPUT_PULLUP);

  Serial.println("Initialization...");

  scale.set_scale(CalFactor);
  scale.tare();
  delay (200);
  Serial.println("Ready");
  delay (100);
}

void loop() {

  tarepb = digitalRead(pb1);
  delay(10);
  if (tarepb == LOW)
  {
    scale.tare();
    Serial.println("TareDONE");
  }
  else
  {
  newread = scale.get_units(5);
  Serial.println("Weight: ");
  Serial.println(newread);
  delay(10);
   }
}
Circuit Diagram:
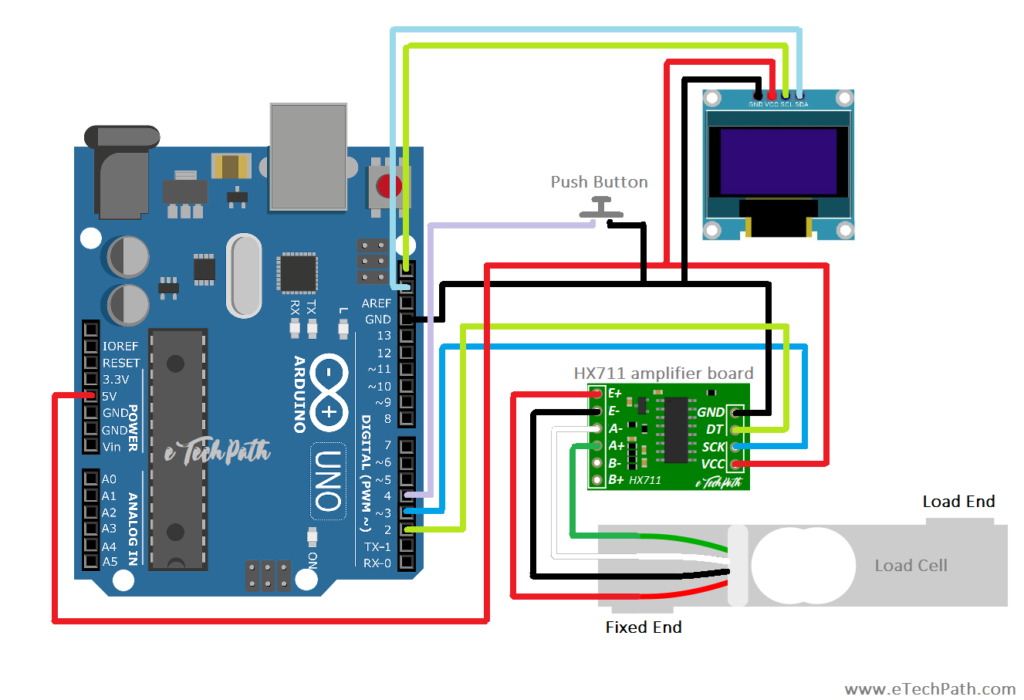
Example 2: In this example we will interface oled display with the existing circuit and print loadcell output values on it.
/**
 *
 * DIY Weighing scale using 10kg loadcell and HX711 amplifier board with Arduino Uno and OLED display
 * Author: Pranay Sawarkar
 * Website: www.eTechPath.com
 * Link: https://blog.etechpath.com/diy-oled-weighing-scale-using-10kg-loadcell-with-hx711-and-arduino-uno/
 *
 *
**/

#include <Arduino.h>
#include <U8g2lib.h>
#include "HX711.h"

#ifdef U8X8_HAVE_HW_SPI
#include <SPI.h>
#endif
#ifdef U8X8_HAVE_HW_I2C
#include <Wire.h>
#endif

//select your oled display type and size
U8G2_SSD1306_128X32_UNIVISION_F_HW_I2C u8g2(U8G2_R0, /* reset=*/ U8X8_PIN_NONE);
//U8G2_SSD1306_128X64_NONAME_F_HW_I2C u8g2(U8G2_R0, /* reset=*/ U8X8_PIN_NONE);

// HX711 circuit wiring
const int Dout_Pin = 2;
const int SCK_Pin = 3;
const int pb1 = 4;
int tarepb = 0;
int newread = 0;
#define CalFactor 235.5   //enter your calibration factor here

HX711 scale;

void setup() {
  Serial.begin(115200);
  u8g2.begin();
  scale.begin(Dout_Pin, SCK_Pin);
  pinMode(pb1, INPUT_PULLUP);

  u8g2.clearBuffer();
  u8g2.setFont(u8g2_font_6x10_tf);
  u8g2.drawStr(0, 20, "Initializing...");
  u8g2.sendBuffer();

  scale.set_scale(CalFactor);
  scale.tare();
  delay (500);
  u8g2.clearBuffer();
  u8g2.drawStr(0, 20, "Ready");
  u8g2.sendBuffer();
  delay (100);

}

void loop() {

  tarepb = digitalRead(pb1);
  delay(10);
  if (tarepb == LOW)
  {
    scale.tare();
    u8g2.clearBuffer();
    u8g2.drawStr(0, 20, "Tare Done");
    Serial.println("TareDONE");
    u8g2.sendBuffer();
  }
  else
  {

  newread = scale.get_units(5);
  Serial.println(newread);
  delay(10);

      u8g2.clearBuffer();
      u8g2.setFont(u8g2_font_6x10_tf);
      u8g2.drawStr(0, 20, "Weight: ");
      u8g2.setCursor(45, 20);
      u8g2.print(newread);
      u8g2.sendBuffer();
      delay(10);

   }
}
Prototype: