
About:
In this project i am going to explain you how to build your own WiFi repeater to extend your home WiFi signal strength. This device is very easy to make and very handy to use. You can use this device at school, college, office or Cafe to extend the WiFi signal without buying expensive WiFi modems from the market.
Components you will need:
- ESP-01 or NodeMCU
- ASM1117 3.3V voltage converter IC
- Male USB connector
- USB-UART adapter for programming ESP-01
- Android or iOS phone to configure settings.
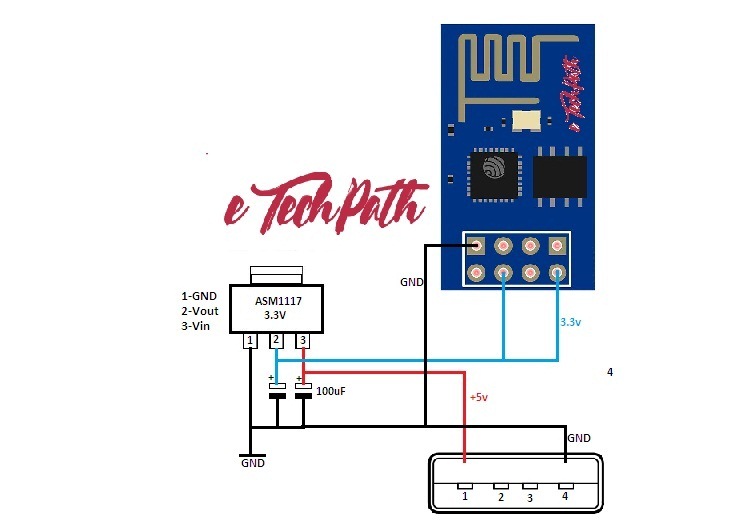
Circuit Diagram for Programming ESP-01 :

Steps:
-
- Connect ESP-01 to UART adapter as shown in above diagram.
- Download firmware files form the bottom of the page, We will flash these files to ESP-01 using ESP flash tools.
- Firmware files are in rar folder, So unrar firmware files first and then open ESP flash download tools.
- Browse downloaded firmware files into given location as shown in bellow picture and write down where do you want flash the particular file, i.e select 0x00000.bin file and then write location to flash @0x00000 after that select 0x10000.bin file and locate it to 0x10000. (refer bellow screenshot for example)
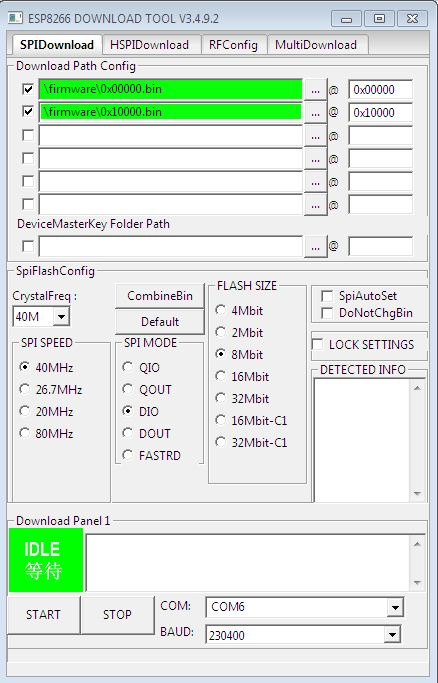
- select COM port and hit START button. (If you dont know how to use flash tool, Check this link on Getting started with ESP8266 to flash ESP-01)
- After flashing firmware to esp-01, disconnect the circuit and connect USB male port to ESP-01 as given in bellow circuit diagram.
- Now you can power this circuit using any 5v USB wall adapter. So power up this circuit and follow the further steps for configuring WiFi AP settings.
- Download Telnet Client Terminal application in your phone. Download links are given in download section at the bottom of this page.
- Power up the circuit, default device will create open access point with name MyAP without any password and default IP will be 192.168.4.1, Open WiFi settings in your phone and connect this open access point.
- Open Telnet Client Terminal in your phone and add two fields as IP: 192.168.4.1 and Port: 7777, hit connect button.
- If everything is ok, terminal will show connected. write command show and hit enter. It will show the current name and password of device STA and AP as shown in bellow screenshot.
- Use these commands to update the username and password of your STA and AP.
- set ssid XXXXXXXX (your home router SSID)
- set password XXXXXXXX (your home router password)
- set ap_ssid XXXXXXXX (new access point name)
- set ap_password XXXXXXXX (new access point password)
- save (save configuration)
- reset (reset device)
- show (this will show updated setting of your device, i.e your routers and access point username and password)
- quit (terminates current remote session)
You are now done with the repeater configuration, reset the ESP once and it will connect your home router with updated ssid and password at the same time it will create an access point with your new access point name and password.
Downloads:
ESP Flash Download Tools v3.4.4
Telnet Client Terminal (Android) (iOS)


1 Comment
Mishah
(October 7, 2018 - 12:34 pm)Ciao, ho provato a fare più volte tutta la procedura sul mio ESP8266-01, ma non mi funziona. Accendo e non c’è nessuna rete MyAp. Devo aggiornare qualche file?