
About this Project:
In this project we will learn how to interfacing ESP8266 module with MAX7219 matrix display to scrolling text message from web user interface. We will use Arduino IDE to program ESP module in this project. I am using MajicDesigns MD_MAX72xx library for running this project, also the code is very similar to included example in the library with some improvements in web user interface html code.
Components:
- MAX7219 8×8 LED Matrix
- ESP8266 Node MCU
- USB Cable for programming and power
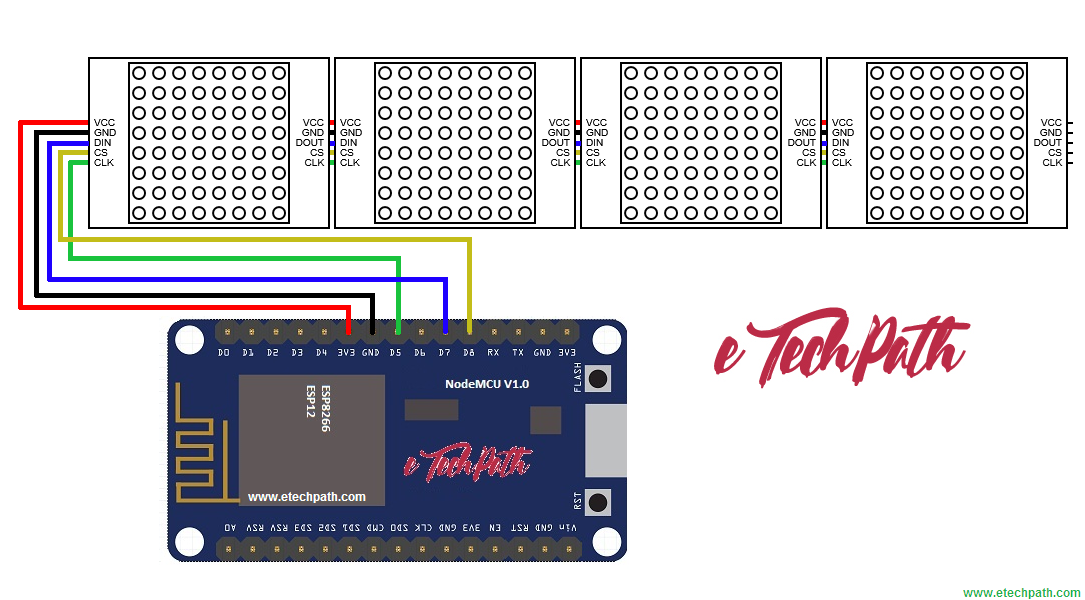
Circuit Diagram:
Steps:
-
-
- Connect the circuit as shown above.
- Install Arduino IDE form arduino website. After that install ESP8266 board and library in Arduino IDE.
- Download and install MD_MAX7219 Library from download section for driving MAX7219 matrix. For using this library you will need to edit MAX72xx.h file for configure the type of LED matrix you are using. In this project we are using FC-16 Chinese module.
- Download code ino file from download section and open it with Arduino IDE.
- You will need to edit WiFi network SSID and Password inside your code before flashing it in ESP module.
const char* ssid = "your SSID";                   // edit your wifi SSID here
const char* password = "your Password";            // edit your wifi password here
- Select board to NodeMCU and flash the code in ESP module.
- Power up the circuit and you will see IP address of your ESP module allocated by your WiFi network on Matrix display. (watch video)
- Now open that IP address in any browser connected in same network. And you will see web user interface to enter text.
- For detailed procedure of configuring WiFi module with your home network and using web interface, please watch embedded YouTube video linked at the bottom of this page.
-
Code:
//Link: https://blog.etechpath.com

#include <ESP8266WiFi.h>
#include <MD_MAX72xx.h>
#include <SPI.h>

#define	PRINT_CALLBACK	0
#define DEBUG 0
#define LED_HEARTBEAT 0

#if DEBUG
#define	PRINT(s, v)	{ Serial.print(F(s)); Serial.print(v); }
#define PRINTS(s)   { Serial.print(F(s)); }
#else
#define	PRINT(s, v)
#define PRINTS(s)
#endif

#if LED_HEARTBEAT
#define HB_LED  D2
#define HB_LED_TIME 500 // in milliseconds
#endif

#define	MAX_DEVICES	4

#define	CLK_PIN		D5 // or SCK
#define	DATA_PIN	D7 // or MOSI
#define	CS_PIN		D8 // or SS

// SPI hardware interface
//MD_MAX72XX mx = MD_MAX72XX(CS_PIN, MAX_DEVICES);
#define HARDWARE_TYPE MD_MAX72XX::PAROLA_HW  //edit this as per your LED matrix hardware type
MD_MAX72XX mx = MD_MAX72XX(HARDWARE_TYPE, CS_PIN, MAX_DEVICES);
// Arbitrary pins
//MD_MAX72XX mx = MD_MAX72XX(DATA_PIN, CLK_PIN, CS_PIN, MAX_DEVICES);

// WiFi login parameters - network name and password
const char* ssid = "your SSID";                   // edit your wifi SSID here
const char* password = "your Password";            // edit your wifi password here

// WiFi Server object and parameters
WiFiServer server(80);

// Global message buffers shared by Wifi and Scrolling functions
const uint8_t MESG_SIZE = 255;
const uint8_t CHAR_SPACING = 1;
const uint8_t SCROLL_DELAY = 75;

char curMessage[MESG_SIZE];
char newMessage[MESG_SIZE];
bool newMessageAvailable = false;

char WebResponse[] = "HTTP/1.1 200 OK\nContent-Type: text/html\n\n";

char WebPage[] =
"<!DOCTYPE html>" \
"<html>" \
"<head>" \
"<title>eTechPath MAX7219 ESP8266</title>" \
"<style>" \
"html, body" \
"{" \
"width: 600px;" \
"height: 400px;" \
"margin: 0px;" \
"border: 0px;" \
"padding: 10px;" \
"background-color: white;" \
"}" \
"#container " \
"{" \
"width: 100%;" \
"height: 100%;" \
"margin-left: 200px;" \
"border: solid 2px;" \
"padding: 10px;" \
"background-color: #b3cbf2;" \
"}" \
"</style>"\
"<script>" \
"strLine = \"\";" \
"function SendText()" \
"{" \
"  nocache = \"/&nocache=\" + Math.random() * 1000000;" \
"  var request = new XMLHttpRequest();" \
"  strLine = \"&MSG=\" + document.getElementById(\"txt_form\").Message.value;" \
"  request.open(\"GET\", strLine + nocache, false);" \
"  request.send(null);" \
"}" \
"</script>" \
"</head>" \
"<body>" \
"<div id=\"container\">"\
"<H1><b>WiFi MAX7219 LED Matrix Display</b></H1>" \
"<form id=\"txt_form\" name=\"frmText\">" \
"<label>Msg:<input type=\"text\" name=\"Message\" maxlength=\"255\"></label><br><br>" \
"</form>" \
"<br>" \
"<input type=\"submit\" value=\"Send Text\" onclick=\"SendText()\">" \
"<p><b>Visit Us at</b></p>" \
"<a href=\"http://www.eTechPath.com\">www.eTechPath.com</a>" \
"</div>" \
"</body>" \
"</html>";

char *err2Str(wl_status_t code)
{
  switch (code)
  {
  case WL_IDLE_STATUS:    return("IDLE");           break; // WiFi is in process of changing between statuses
  case WL_NO_SSID_AVAIL:  return("NO_SSID_AVAIL");  break; // case configured SSID cannot be reached
  case WL_CONNECTED:      return("CONNECTED");      break; // successful connection is established
  case WL_CONNECT_FAILED: return("CONNECT_FAILED"); break; // password is incorrect
  case WL_DISCONNECTED:   return("CONNECT_FAILED"); break; // module is not configured in station mode
  default: return("??");
  }
}
uint8_t htoi(char c)
{
  c = toupper(c);
  if ((c >= '0') && (c <= '9')) return(c - '0');
  if ((c >= 'A') && (c <= 'F')) return(c - 'A' + 0xa);
  return(0);
}
boolean getText(char *szMesg, char *psz, uint8_t len)
{
  boolean isValid = false;  // text received flag
  char *pStart, *pEnd;      // pointer to start and end of text
  // get pointer to the beginning of the text
  pStart = strstr(szMesg, "/&MSG=");
  if (pStart != NULL)
  {
    pStart += 6;  // skip to start of data
    pEnd = strstr(pStart, "/&");
    if (pEnd != NULL)
    {
      while (pStart != pEnd)
      {
        if ((*pStart == '%') && isdigit(*(pStart+1)))
        {
          // replace %xx hex code with the ASCII character
          char c = 0;
          pStart++;
          c += (htoi(*pStart++) << 4);
          c += htoi(*pStart++);
          *psz++ = c;
        }
        else
          *psz++ = *pStart++;
      }
      *psz = '\0'; // terminate the string
      isValid = true;
    }
  }
  return(isValid);
}
void handleWiFi(void)
{
  static enum { S_IDLE, S_WAIT_CONN, S_READ, S_EXTRACT, S_RESPONSE, S_DISCONN } state = S_IDLE;
  static char szBuf[1024];
  static uint16_t idxBuf = 0;
  static WiFiClient client;
  static uint32_t timeStart;

  switch (state)
  {
  case S_IDLE:   // initialise
    PRINTS("\nS_IDLE");
    idxBuf = 0;
    state = S_WAIT_CONN;
    break;
  case S_WAIT_CONN:   // waiting for connection
    {
      client = server.available();
      if (!client) break;
      if (!client.connected()) break;
#if DEBUG
      char szTxt[20];
      sprintf(szTxt, "%03d:%03d:%03d:%03d", client.remoteIP()[0], client.remoteIP()[1], client.remoteIP()[2], client.remoteIP()[3]);
      PRINT("\nNew client @ ", szTxt);
#endif
      timeStart = millis();
      state = S_READ;
    }
    break;
  case S_READ: // get the first line of data
    PRINTS("\nS_READ");
    while (client.available())
    {
      char c = client.read();
      if ((c == '\r') || (c == '\n'))
      {
        szBuf[idxBuf] = '\0';
        client.flush();
        PRINT("\nRecv: ", szBuf);
        state = S_EXTRACT;
      }
      else
        szBuf[idxBuf++] = (char)c;
    }
    if (millis() - timeStart > 1000)
    {
      PRINTS("\nWait timeout");
      state = S_DISCONN;
    }
    break;
  case S_EXTRACT: // extract data
    PRINTS("\nS_EXTRACT");
    // Extract the string from the message if there is one
    newMessageAvailable = getText(szBuf, newMessage, MESG_SIZE);
    PRINT("\nNew Msg: ", newMessage);
    state = S_RESPONSE;
    break;
  case S_RESPONSE: // send the response to the client
    PRINTS("\nS_RESPONSE");
    // Return the response to the client (web page)
    client.print(WebResponse);
    client.print(WebPage);
    state = S_DISCONN;
    break;
  case S_DISCONN: // disconnect client
    PRINTS("\nS_DISCONN");
    client.flush();
    client.stop();
    state = S_IDLE;
    break;

  default:  state = S_IDLE;
  }
}
void scrollDataSink(uint8_t dev, MD_MAX72XX::transformType_t t, uint8_t col)
// Callback function for data that is being scrolled off the display
{
#if PRINT_CALLBACK
  Serial.print("\n cb ");
  Serial.print(dev);
  Serial.print(' ');
  Serial.print(t);
  Serial.print(' ');
  Serial.println(col);
#endif
}
uint8_t scrollDataSource(uint8_t dev, MD_MAX72XX::transformType_t t)
// Callback function for data that is required for scrolling into the display
{
  static enum { S_IDLE, S_NEXT_CHAR, S_SHOW_CHAR, S_SHOW_SPACE } state = S_IDLE;
  static char		*p;
  static uint16_t	curLen, showLen;
  static uint8_t	cBuf[8];
  uint8_t colData = 0;
  // finite state machine to control what we do on the callback
  switch (state)
  {
  case S_IDLE: // reset the message pointer and check for new message to load
    PRINTS("\nS_IDLE");
    p = curMessage;      // reset the pointer to start of message
    if (newMessageAvailable)  // there is a new message waiting
    {
      strcpy(curMessage, newMessage); // copy it in
      newMessageAvailable = false;
    }
    state = S_NEXT_CHAR;
    break;
  case S_NEXT_CHAR: // Load the next character from the font table
    PRINTS("\nS_NEXT_CHAR");
    if (*p == '\0')
      state = S_IDLE;
    else
    {
      showLen = mx.getChar(*p++, sizeof(cBuf) / sizeof(cBuf[0]), cBuf);
      curLen = 0;
      state = S_SHOW_CHAR;
    }
    break;
  case S_SHOW_CHAR:	// display the next part of the character
    PRINTS("\nS_SHOW_CHAR");
    colData = cBuf[curLen++];
    if (curLen < showLen)
      break;
    // set up the inter character spacing
    showLen = (*p != '\0' ? CHAR_SPACING : (MAX_DEVICES*COL_SIZE)/2);
    curLen = 0;
    state = S_SHOW_SPACE;
    // fall through
  case S_SHOW_SPACE:	// display inter-character spacing (blank column)
    PRINT("\nS_ICSPACE: ", curLen);
    PRINT("/", showLen);
    curLen++;
    if (curLen == showLen)
      state = S_NEXT_CHAR;
    break;
  default:
    state = S_IDLE;
  }
  return(colData);
}
void scrollText(void)
{
  static uint32_t	prevTime = 0;
  // Is it time to scroll the text?
  if (millis() - prevTime >= SCROLL_DELAY)
  {
    mx.transform(MD_MAX72XX::TSL);	// scroll along - the callback will load all the data
    prevTime = millis();			// starting point for next time
  }
}
void setup()
{
#if DEBUG
  Serial.begin(115200);
  PRINTS("\n[MD_MAX72XX WiFi Message Display]\nType a message for the scrolling display from your internet browser");
#endif
#if LED_HEARTBEAT
  pinMode(HB_LED, OUTPUT);
  digitalWrite(HB_LED, LOW);
#endif
  // Display initialisation
  mx.begin();
  mx.setShiftDataInCallback(scrollDataSource);
  mx.setShiftDataOutCallback(scrollDataSink);
  curMessage[0] = newMessage[0] = '\0';
  // Connect to and initialise WiFi network
  PRINT("\nConnecting to ", ssid);
  WiFi.begin(ssid, password);
  while (WiFi.status() != WL_CONNECTED)
  {
    PRINT("\n", err2Str(WiFi.status()));
    delay(500);
  }
  PRINTS("\nWiFi connected");
  // Start the server
  server.begin();
  PRINTS("\nServer started");
  // Set up first message as the IP address
  sprintf(curMessage, "%03d:%03d:%03d:%03d", WiFi.localIP()[0], WiFi.localIP()[1], WiFi.localIP()[2], WiFi.localIP()[3]);
  PRINT("\nAssigned IP ", curMessage);
}
void loop()
{
#if LED_HEARTBEAT
  static uint32_t timeLast = 0;
  if (millis() - timeLast >= HB_LED_TIME)
  {
    digitalWrite(HB_LED, digitalRead(HB_LED) == LOW ? HIGH : LOW);
    timeLast = millis();
  }
#endif
  handleWiFi();
  scrollText();
}
Downloads:
Video:
How to solve mirror image and orientation problems of matrix display if you are using old MD_MAX72xx library.


34 Comments
Kailash Giri
(December 18, 2017 - 7:02 am)Thank You.
psadminetechpath
(February 12, 2018 - 7:21 pm)Welcome …..
Bogdan
(January 31, 2018 - 1:36 am)Thanks for the tutorial. After a few hours of searching online, your was the only one to work. Managed to have it running in a few minutes on an ESP8266 12-F.
Cialis 20 mg
(March 25, 2018 - 11:41 pm)You can certainly see your expertise in the work you write. The world hopes for more passionate writers like you who are not afraid to say how they believe. Always follow your heart.
Daruosh
(May 7, 2018 - 9:46 am)Hi, I made your project,but it is mirror,How can I correct it,by the way I put my ip addres on browser but,that page you show on video don’t come,could you please let me know how to do that. thanks again
psadminetechpath
(May 7, 2018 - 10:12 pm)In that case, you need to change the MD_MAX library setting according to your LED matrix model.
LegendaryZAYNE
(November 15, 2018 - 8:29 pm)How can I do that?
psadminetechpath
(December 9, 2018 - 12:38 am)The details are given in the tutorial ..
Manuel McLure
(May 23, 2018 - 1:01 am)Thanks for the tutorial. I implemented this with a SN74AHCT125N as a 3.3-5V level shifter for the signals and it works great.
psadminetechpath
(May 23, 2018 - 1:18 am)That’s great … 👍🏻
Keep it up
Frank
(June 1, 2018 - 12:35 am)Thanks a lot, this works great with my nodemcu.
What I was really trying to do though was to use MQTT messages to feed the display instead of the website. I got this working with pubsubclient for an IR sender that switches on/off my old AV Receiver. But not succeeding with the 8×8.
Any chance you will give this a try and make it work? (Please)
psadminetechpath
(June 1, 2018 - 12:39 am)Share your project details with me, may be I can help …
email : admin@blog.etechpath.com
psadminetechpath
(June 2, 2018 - 8:41 pm)Good idea, I will give it a try and let you know if it works for me …
Brian
(June 2, 2018 - 2:02 pm)Hi,
Thanks for your work and sharing this program. I played around with it, and found that I was unable to connect to port 80 on the ESP8266, when it was on my Apple Airport accesspoint but when connected to a hotspot on my android phone it worked.
I also notised that the ESP8266 starts its own AP – atleast when I was not able to connect to the ESP8266 on port 80.
So I added this line before “WiFi.begin(ssid, password);” and it solved my issue.
WiFi.mode(WIFI_STA);
It makes the ESP8266 act as a client to the network only, meaning it won’t start an AP own.
psadminetechpath
(June 2, 2018 - 8:37 pm)Great job, and thank you for sharing your code modification.
It would be great if you can copy paste your full code in comments of this post so that other visitors can try your code too.
amen
(September 13, 2018 - 1:21 am)hi there, can you send to me your source code and it might help me to solve my problem. Thank you
Brian
(June 9, 2018 - 10:15 pm)Below is the code, its mostly unchanged:
1. I did remove some log/serial output, when debuging is enabled. But everyone can just take the original code and add the mods I made if they wan’t to 🙂
2.
Added:
WiFi.mode(WIFI_STA);
Due to my tests I will start adding this in all my future programs where I only want clientmode.
3.
mx.control(MD_MAX72XX::INTENSITY, 0);
Added the line above – it lets you change how bright you want the display to be. Default is half intensity meaning 7. Valid values are 0-15.
Code: https://pastebin.com/0X68XJ3n
Dani
(July 24, 2018 - 4:53 pm)I made this fabulous message display to show me some text information from domoticz.
but the question now is..: How can i send a http command complete with message to display?
Must i make a script which logs in and places the text and send a return ?
Anybody who can assist me?
Cheers Dani
Matko
(August 14, 2018 - 4:15 pm)Did not work
psadminetechpath
(October 22, 2018 - 12:12 am)Let me know the issue, may be i can help