
About:
In this project we are going to control 1 watt RGB full color LED diode using WiFi module ESP8266-01. You can use any WiFi enabled device to access web interface to control this RGB LED. Watch video at the bottom of this page.
Things you will need:
- 1W RGB LED
- ESP-01 WiFi module
- 10Ω Resistance
- ASM1117 3.3v (or any 3.3v voltage source)
- USB to TTL converter (for programming esp-01)
- Momentary push button (optional)
- Android / Apple / Windows Phone or any WiFi enabled Laptop / Desktop (to control RGB LED)
Circuit Diagram for programming ESP-01 :

Steps :
-
- Connect the circuit on breadboard as shown in above circuit diagram for programming ESP-01 WiFi module. You must use only 3.3v logic setting in TTL device.
- In this tutorial we will used Arduino IDE to download code into ESP module. So, install Arduino IDE and add supporting board manager and ESP library into it. (Download links are given in download section)
- Download and save source code on your computer and open it up using Arduino IDE.
- Connect USB to TTL module to your computer.
- Open Arduino IDE – Select board ‘Generic ESP8266 Module’ – Select Port of your TTL device (Here’s How to)
- Open downloaded code.ino file into arduino and upload the code into ESP module by pressing upload button.
- After uploading, Disconnect the ESP module from USB-TTL module and connect it to RGB LED as shown in bellow diagram.
Circuit Diagram for connecting RGB LED:
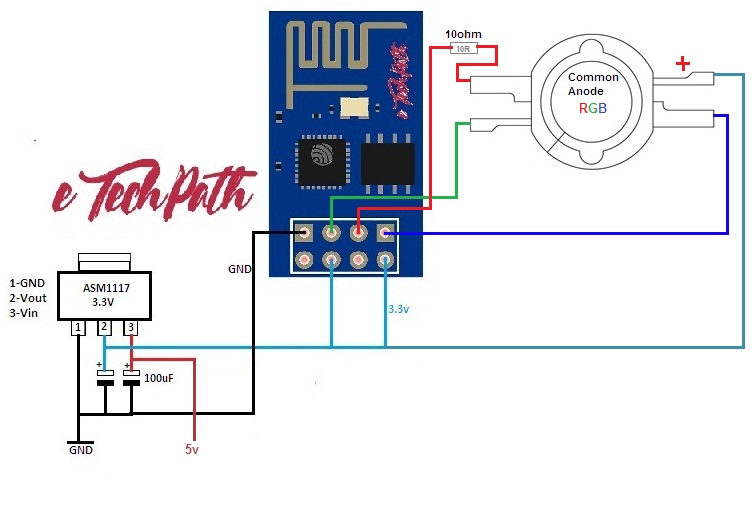
Steps:
-
- Connect the final circuit as shown in above diagram and power it up using 5v battery or wall adapter.
- ESP module will boot up and LED light will show fade effect in all three colors at startup.
- Then open your device WiFi in discovery mode and you will see a new WiFi access point, named as RGB in discovery list.
- Connect that WiFi access point, Open any web browser in that device and open ip address 192.168.1.1 , thats it, you will see a colorful RGB control screen to control your wireless RGB LED.
Note: Do not feed more than 3.3v to ESP-01 module
Source Code :
/* RGB web server with ESP8266-01 (ESP-01)
* There are only 2 GPIOs available in ESP-01: 0 and 2
* but RX and TX can also be used as: 3 and 1
* Wiring Circuit
* 0=Red (GPIO0) D3
* 2=Green (GPIO2) D4
* 3=Blue (GPIO3) Rx
* www.etechpath.com
*/

#include <ESP8266WiFi.h>
#include <DNSServer.h>
#include <ESP8266WebServer.h>

const char *ssid = "RGB";
//Uncomment below line if you wish to set a password for ESP wifi network...
// const char *password = "87654321";

const byte DNS_PORT = 53;
IPAddress apIP(192, 168, 1, 1);   //IP address of your ESP
DNSServer dnsServer;
ESP8266WebServer webServer(80);

//Webpage html Code
String webpage = ""
"<!DOCTYPE html><html><head><title>RGB control eTechPath.com</title><meta name='mobile-web-app-capable' content='yes' />"
"<meta name='viewport' content='width=device-width' /></head><body style='margin: 0px; padding: 0px;'>"
"<canvas id='colorspace'></canvas>"
"</body>"
"<script type='text/javascript'>"
"(function () {"
" var canvas = document.getElementById('colorspace');"
" var ctx = canvas.getContext('2d');"
" function drawCanvas() {"
" var colours = ctx.createLinearGradient(0, 0, window.innerWidth, 0);"
" for(var i=0; i <= 360; i+=10) {"
" colours.addColorStop(i/360, 'hsl(' + i + ', 100%, 50%)');"
" }"
" ctx.fillStyle = colours;"
" ctx.fillRect(0, 0, window.innerWidth, window.innerHeight);"
" var luminance = ctx.createLinearGradient(0, 0, 0, ctx.canvas.height);"
" luminance.addColorStop(0, '#ffffff');"
" luminance.addColorStop(0.05, '#ffffff');"
" luminance.addColorStop(0.5, 'rgba(0,0,0,0)');"
" luminance.addColorStop(0.95, '#000000');"
" luminance.addColorStop(1, '#000000');"
" ctx.fillStyle = luminance;"
" ctx.fillRect(0, 0, ctx.canvas.width, ctx.canvas.height);"
" }"
" var eventLocked = false;"
" function handleEvent(clientX, clientY) {"
" if(eventLocked) {"
" return;"
" }"
" function colourCorrect(v) {"
" return Math.round(1023-(v*v)/64);"
" }"
" var data = ctx.getImageData(clientX, clientY, 1, 1).data;"
" var params = ["
" 'r=' + colourCorrect(data[0]),"
" 'g=' + colourCorrect(data[1]),"
" 'b=' + colourCorrect(data[2])"
" ].join('&');"
" var req = new XMLHttpRequest();"
" req.open('POST', '?' + params, true);"
" req.send();"
" eventLocked = true;"
" req.onreadystatechange = function() {"
" if(req.readyState == 4) {"
" eventLocked = false;"
" }"
" }"
" }"
" canvas.addEventListener('click', function(event) {"
" handleEvent(event.clientX, event.clientY, true);"
" }, false);"
" canvas.addEventListener('touchmove', function(event){"
" handleEvent(event.touches[0].clientX, event.touches[0].clientY);"
"}, false);"
" function resizeCanvas() {"
" canvas.width = window.innerWidth;"
" canvas.height = window.innerHeight;"
" drawCanvas();"
" }"
" window.addEventListener('resize', resizeCanvas, false);"
" resizeCanvas();"
" drawCanvas();"
" document.ontouchmove = function(e) {e.preventDefault()};"
" })();"
"</script></html>";
void handleRoot()
{
// Serial.println("handle root..");
String red = webServer.arg(0); // read RGB arguments
String green = webServer.arg(1);  // read RGB arguments
String blue = webServer.arg(2);  // read RGB arguments

//for common anode
analogWrite(0, red.toInt());
analogWrite(2, green.toInt());
analogWrite(3, blue.toInt());
//for common cathode
//analogWrite(0,1023 - red.toInt());
//analogWrite(2,1023 - green.toInt());
//analogWrite(3,1023 - blue.toInt());
webServer.send(200, "text/html", webpage);
}
void setup()
{
pinMode(0, OUTPUT);
pinMode(2, OUTPUT);
pinMode(3, OUTPUT);

analogWrite(0, 1023);
analogWrite(2, 1023);
analogWrite(3, 1023);
delay(1000);
WiFi.mode(WIFI_AP);
WiFi.softAPConfig(apIP, apIP, IPAddress(255, 255, 255, 0));
WiFi.softAP(ssid);
dnsServer.start(DNS_PORT, "rgb", apIP);
webServer.on("/", handleRoot);
webServer.begin();
testRGB();
}
void loop()
{
dnsServer.processNextRequest();
webServer.handleClient();
}
void testRGB()
{
// fade in and out of Red, Green, Blue
analogWrite(0, 1023); // Red off
analogWrite(2, 1023); // Green off
analogWrite(3, 1023); // Blue off

fade(0); // Red fade effect
fade(2); // Green fade effect
fade(3); // Blue fade effect
}
void fade(int pin)
{
for (int u = 0; u < 1024; u++)
{
analogWrite(pin, 1023 - u);
delay(1);
}
for (int u = 0; u < 1024; u++)
{
analogWrite(pin, u);
delay(1);
}
}
Downloads:
6 Comments
psadminetechpath
(April 4, 2018 - 4:33 am)Thank You, Actually this layout is copy of a WordPress theme named ‘bfastmag’. i have just made some changes in it.
Loyd
(April 4, 2018 - 5:13 pm)Oh my goodness! Awesome article dude! Thank you, However I am
going through troubles with your RSS. I don’t understand why
I am unable to join it. Is there anyone else getting similar
RSS issues? Anyone who knows the answer can you kindly respond?
Thanx!!
psadminetechpath
(May 16, 2018 - 7:42 am)Try subscribing us instead …. 🙂
web page
(May 10, 2018 - 1:46 am)I alll the time ᥙsed to гead post in news papers but
now аs I ɑm a user off web ѕo from now I amm սsing net
for articles oг reviews, thanhks tοo web.
Google
(May 13, 2018 - 9:36 pm)Google
Always a huge fan of linking to bloggers that I love but do not get lots of link adore from.
Freddy Mcgunagle
(August 3, 2018 - 10:12 pm)This is great post. Thank you for sharing.