
About:
Nextion is a smart hardware HMI (Human Machine Interface) solution published by ITEAD that provides visualization and control interface between human and machine. Nextion HMI comes with simple serial interface and can be easily communicate with Arduino, raspberry pi and other serial Interface compatible hardware’s.
In this post, I will explain how to draw basic HMI screens, setting tag names and reading tags using Arduino.
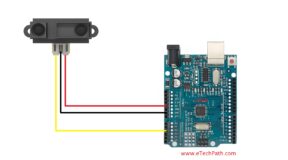
Circuit Diagram:
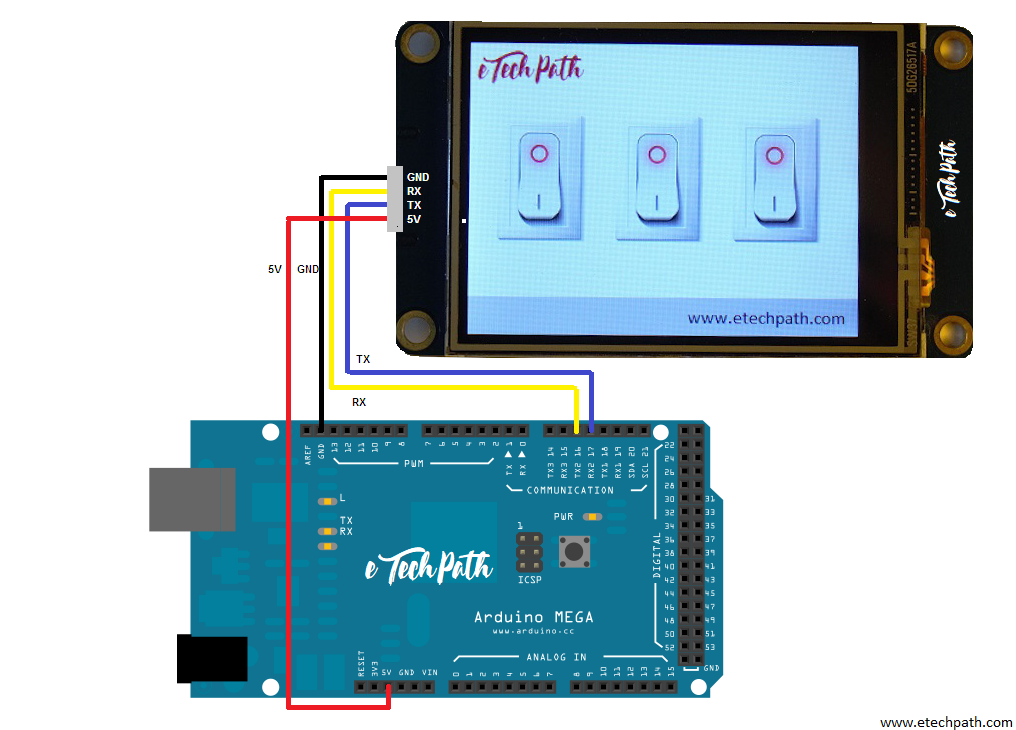
Nextion HMI Designing:
Watch bellow video for complete tutorial on how to operate Nextion HMI graphic designing software.
Arduino Code:
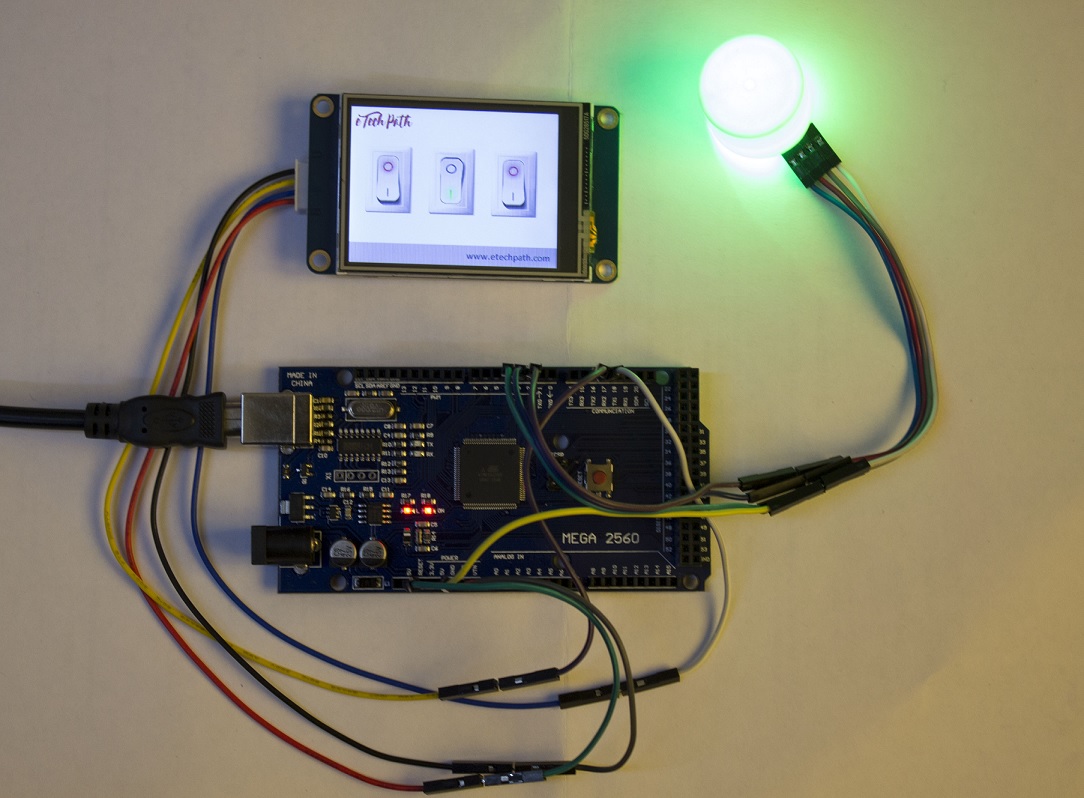
Note: I am using common anode RGB LED for output testing purpose. So I have written this code to operate common anode LED as output. If you want to drive relays instead of LED, you will need to change the code a bit.
/***************************************************************************************************************
*    Nextion HMI Basic Example : Three Buttons
*    Version 1.0
*    Created By: Pranay Sawarkar
*         Email: admin@blog.etechpath.com
*    All Rights Reserved © 2018 www.etechpath.com
*
*    Download necessary libraries from the links mentioned in download section in the post,
*    Post Link: https://blog.etechpath.com/how-to-interface-nextion-hmi-with-arduino-mega2560-and-learn-how-to-use-nextion-editor-and-program-tags-in-arduino
*
*************************************************************************************************************************/

#include "Nextion.h"

int S1 = 2, S2 = 3, S3 = 4;

NexDSButton bt0 = NexDSButton(0, 2, "bt0");
NexDSButton bt1 = NexDSButton(0, 3, "bt1");
NexDSButton bt2 = NexDSButton(0, 4, "bt2");

char buffer[100] = {0};

NexTouch *nex_listen_list[] =
{
    &bt0, &bt1, &bt2,
    NULL
};
void setup(void)
{
    pinMode(2,OUTPUT);
    pinMode(3,OUTPUT);
    pinMode(4,OUTPUT);
    digitalWrite(S1, HIGH);
    digitalWrite(S2, HIGH);
    digitalWrite(S3, HIGH);
    nexInit();
    bt0.attachPop(bt0PopCallback, &bt0);
    bt1.attachPop(bt1PopCallback, &bt1);
    bt2.attachPop(bt2PopCallback, &bt2);
    dbSerialPrintln("setup done");
}
void loop(void)
{
    nexLoop(nex_listen_list);
}

void bt0PopCallback(void *ptr)
{
    uint32_t dual_state;
    NexDSButton *btn = (NexDSButton *)ptr;
    dbSerialPrintln("Callback");
    dbSerialPrint("ptr=");
    dbSerialPrintln((uint32_t)ptr);
    memset(buffer, 0, sizeof(buffer));
    bt0.getValue(&dual_state);
    if(dual_state){digitalWrite(S1, LOW);}else{digitalWrite(S1, HIGH);}
}
void bt1PopCallback(void *ptr)
{
    uint32_t dual_state;
    NexDSButton *btn = (NexDSButton *)ptr;
    dbSerialPrintln("Callback");
    dbSerialPrint("ptr=");
    dbSerialPrintln((uint32_t)ptr);
    memset(buffer, 0, sizeof(buffer));
    bt1.getValue(&dual_state);
    if(dual_state){digitalWrite(S2, LOW);}else{digitalWrite(S2, HIGH);}
}
void bt2PopCallback(void *ptr)
{
    uint32_t dual_state;
    NexSButton *btn = (NexDSButton *)ptr;
    dbSerialPrintln("Callback");
    dbSerialPrint("ptr=");
    dbSerialPrintln((uint32_t)ptr);
    memset(buffer, 0, sizeof(buffer));
    bt2.getValue(&dual_state);
    if(dual_state){digitalWrite(S3, LOW);}else{digitalWrite(S3, HIGH);}
}
HMI with Arduino working video:
https://www.youtube.com/watch?v=2RTYilN8xvs
Downloads :

7 Comments
John Hoffman
(November 19, 2018 - 5:57 am)I am using Nextion basic 5″ and Arduino MEGA 2560 Rev3
I watched the video and copied the code and download HMI ( had to change device to 5″)
Outputs are not changing state and I get the output window below. ( Not sure why I would be getting the multiple “err”‘s )
recvRetCommandFinished err
recvRetCommandFinished err
setup done
[1694:0,2,bt0]
Callback
ptr=1694
recvRetNumber err
psadminetechpath
(November 25, 2018 - 8:06 am)Can you copy paste your error here .. i will try to rectify the problem ..
Siddhi
(December 7, 2018 - 2:18 pm)Hello, actually I am having doubt for the arduino and nextion screen display .
I am getting the input on the digital pin of arduino and by using pulse in function I am calculating the time period of the pin being low.
And then I have a formula in which I placed that time value and the answer of the formula needs to be displayed on the nextion screen. I have used text box for that and programed according t that but I am not getting the value on the screen but getting on the serial monitor of arduino. So can you help me out. Thank you.
psadminetechpath
(December 9, 2018 - 12:36 am)If you are getting output on serial monitor and not on nextion means there is something wrong in particular tag definition for text box. Check your code again.
Or send your code and nextion hmi file to me, i will try to help you out with the code..
siddhi
(December 10, 2018 - 3:30 pm)arduino code:
#include
//#include
int speed1=8;
unsigned long val;
float val1;
int speed2;
void setup() {
pinMode(8,INPUT);
Serial.begin(9600);
}
void loop() {
val =pulseIn(speed1,LOW);
Serial.println(val);
val1=val*0.000001;
Serial.println(val1,4);
int speed2=0.9375/val1;
Serial.println(speed2);
Serial.print(“SPEED.txt”);
delay(1000);
}
siddhi
(December 11, 2018 - 2:19 pm)Thank you sir for your help.I got the output. I did small mistake in my arduino sketch that’s wahy i was unable to get the ouput on the screen.
Sahil Ahmad
(January 9, 2019 - 11:26 pm)I am also getting the same error (recvRetCommandFinished err). Getting this error wherever I am trying to write on any text box. Can you please help?