About:
In this post i will explain you how to program your ESP8266 board using Arduino IDE software.
Things you will need:
- ESP8266 Node MCU or any Generic ESP8266
- USB to Serial TTL adapter. (CH340, CP2102, FTDI )
- 3.3v voltage source.
- A computer with Arduino IDE
Procedure:
Part 1 : Make your Arduino IDE ready for ESP boards
- Install Arduino IDE in your computer if you are using it for first time. (Arduino IDE)
- Open Arduino IDE, go to File – Preferences – find Additional board manager URL input box and copy paste below link to it and hit OK button.
http://arduino.esp8266.com/stable/package_esp8266com_index.json
- Then go to Tools – Board – Board Manager and search for ESP8266, select latest version form the drop-down list and hit install button.

- You are done with setting Arduino IDE now, here is a simple video tutorial if you have any doubt with the above procedure..
Part 2 : Installing USB driver for your USB to Serial/TTL adapter
Depending on what adapter you are using for connecting ESP8266 serially with your computer, download and install respective drivers in your computer. Here i am linking some address of widely used programming adapters.
If you are unsure about the present driver ic on your ESP8266 or adapter board, then you can conform it visually form bellow picture.

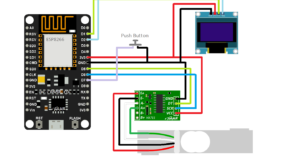
Part 3 : Connection and uploading your first code to ESP8266
Connect esp8266 board to USB port of your computer and check its COM port (here’s how to) in device manager. Then select your ESP board type and COM port in Arduino IDE, that’s it you are ready to upload your first code.