About:
In this project i will teach you how to interface ILI9163C TFT LCD color display module with STM32F103 Arm cortex microcontroller to display DHT11 temperature sensor value.
ILI9163C : It is a 1.44″ color TFT display with SPI interface. This tft comes very cheap but has lot of impressive futures and support very high speed SPI transfer of about 40Mhz. Available in two variants in market, one with the black pcb and other one with the red pcb. In this project we will use black pcb.
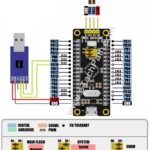
STM32F103: A 32bit arm cortex high speed microcontroller. This is a very cheap, fast & advanced alternative to Arduino and can be program using Arduino IDE with simple USB bootloader. In this project we will use Black Pill STM32F103 board with USB bootloader.
DHT11: A very famous and widely used temperature & humidity sensor. This sensor uses resistive type NTC temperature measurement component with high performance 8bit microcontroller to provide calibrated digital signal output. It has measurement range of 0 to 50 degree Celsius.
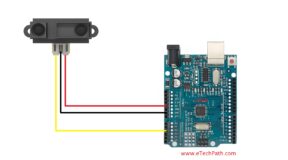
Circuit Diagram:

Code:
 /*
* Project: Interfacing TFT LCD ILI9163C & DHT11 Temperature Sensor with STM32F103 32bit Microcontroller
* Author: Pranay SS, eTechPath
* Website: www.etechpath.com
* Tutorial Link:
* Video Link:
*/


#include <SPI.h>
#include <Adafruit_GFX.h>
#include <TFT_ILI9163C.h>
#include <Fonts/FreeSerifItalic9pt7b.h>
#include <dht11.h>
#define RST PB5
#define DC PB6
#define CS PB7


dht11 DHT11;

#define DHT11PIN PC13

// Definition of colours
#define  BLACK   0x0000
#define BLUE    0x001F
#define RED     0xF800
#define GREEN   0x07E0
#define CYAN    0x07FF
#define MAGENTA 0xF81F
#define YELLOW  0xFFE0
#define WHITE   0xFFFF

float xh = 0;
float yh = 0;
int zh;


TFT_ILI9163C tft = TFT_ILI9163C(CS, DC, RST);

void setup() {
  tft.begin();
  tft.drawRect(5,70,118,20,WHITE);
  tft.setCursor(22,79);
  tft.setFont(&FreeSerifItalic9pt7b);
  tft.setTextColor(RED);
  tft.setTextSize(1);
  tft.print("eTechPath");
  tft.setFont();
  tft.setCursor(10,91);
  tft.setTextColor(WHITE);
  tft.print("www.etechpath.com");

}

void loop(){

    int chk = DHT11.read(DHT11PIN);
  if(zh != chk)
  {tft.fillRect(00,15,128,8,BLACK);}
  tft.setCursor(5, 5);
  tft.setTextColor(WHITE);
  tft.setTextSize(1);
  tft.println("Sensor Status");
  Serial.print("Read sensor: ");
  switch (chk)
  {
    case DHTLIB_OK:
        tft.setCursor(10, 15);
        tft.println("OK");
        Serial.println("OK ");
        break;
    case DHTLIB_ERROR_CHECKSUM:
        tft.setCursor(10, 15);
        tft.println("Checksum Error");
        Serial.println("Checksum error");
        break;
    case DHTLIB_ERROR_TIMEOUT:
        tft.setCursor(10,15);
        tft.println("Time out error");
        Serial.println("Time out error");
        break;
    default:
        tft.setCursor(10,15);
        tft.println("Unknown error");
        Serial.println("Unknown error");
        break;
  }

  float x = DHT11.humidity;
  float y = DHT11.temperature;

  if (xh != x)
  {tft.fillRect(70,30,30,8,BLACK);
  tft.setCursor(5,30);
  tft.print("Humidity = ");
  tft.print(x);
  tft.println(" (%)");}
  if (yh != y)
  {tft.fillRect(46,50,30,8,BLACK);
  tft.setCursor(5,50);
  tft.print("Temp = ");
  tft.print(y);
  tft.print(" (C) ");}
  Serial.print("Temperature = ");
  Serial.print((float)DHT11.temperature);
  Serial.print(" (C) ");
  delay(500);
  xh = x;
  yh = y;
  zh = chk;
}
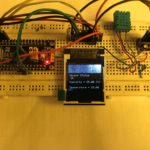
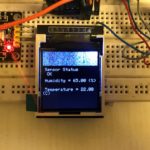
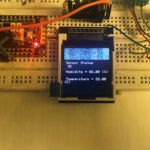
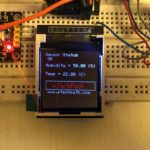
Project Images:
Note: Follow bellow tutorial if you want to know, how to burn USB bootloader in STM32 black-pill board.